
Copper Roofing
Copyright 2008 by Kevin Shea, Tracie Shea, Morris Rosenthal
- Roughing a Post
- Cutting a Mortise
- Mortise and Tenon
- Peg Making
- Steam Box Design
- Steam Bending
- Arch Brace Lamination
- Scribing a King Post
- Fitting an Arch Brace
- Copper Roofing
Copyright 2008 by Morris Rosenthal
All Rights Reserved
Forming and Installing a Standing Seam Copper Roof

|
If you're going to build a timber frame with a 14 pitch roof, you may as well go with standing seam copper. While the materials will run you $20,000 or $30,000 in today's market, you have the roof for 75 or 100 years, and if the price of copper keeps going up, your grandchildren may be able to sell it for scrap in the 22nd century. Most standing seam roofs are constructed from preformed panels these days, the metal workers equivalent of framing a house with pre-built trusses. Preformed panels probably work best with new construction where the dimensions are all pretty accurate, but somebody still needs to know what they're doing. The system we're using here is a standing seam panformer with hydraulic drive & shear from Roll Former Corporation. The panels are formed on site and sent them up the roof. Our copper roofing expert does the measurements and forms the panel ends before they go on the roof. |
| You can see a 24" wide sheet that the roll former is forming with a male and female edge for forming the standing seam. The copper used is 16 ounce, which means a square foot of the the stuff weighs a pound. Forming the edges without stretching the heck out of the copper and weakening it requires a whole series of rollers inside the black box which do the job gradually. While the formed edges give the roofing panels enough rigidity for medium lengths, our timber frame requires 22 foot panels, which would bend and crease under their own weight if left unsupported. So the standing seam machine has been mounted on a frame that holds it at the same angle as the 14 pitch roof, so as soon as the panel reaches the roof, it's lying flat as it gets pushed up by the roll former. Of course, getting a roll of copper that weighs a couple thousand pounds in place is a bit of a trick. |

|
|
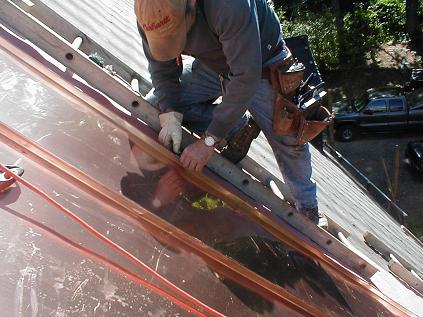
The first step in permanently installing the standing seam panels on the roof is to attach the male edge of the panel to the roof with the special brackets. This is done in place on the roof, working from a chicken ladder, hooked over the peak. The panels are not heavy to work with, but they are a bit clumsy due to the limited structural rigidity. One of the hazards of working on copper roofs is you are essentially working above a giant mirror, such as the "Burning Mirrors" Archimedes used to set the invading Roman fleet on fire. Depending on the position of the sun and your protective clothing, you can get quite a burn if you aren't paying attention. Nor would I suggest putting bright copper on a parabolic shaped roof that happens to be pointed at a forest. |
| The cleats used to fasten the panels to the roof are stainless steel. A rosin building paper goes above the tar paper and below the copper, in part as a final vapor barrier to prevent condensation of water that may react with tar and lead to an acid that could corrode the copper roof from the inside out. The paper gets overlapped by four inches or so at the seams. The cleat is hand crimped around the male edge of the panel with a special tool, and locked into place with two stainless steel screws. Although I'm not going to show it in this short series (an entire website dedicated to copper roofing is pending), soldering still comes into play in the trickier areas, like around the six dormers on the roof. |

|

|
The diabolical looking machine Kevin is holding on the peak before sending it down to me is a self propelled seamer. In fact, it's so self propelled, that there's a danger it may ride up off the seam and take a tumble, creating both a safety and a financial hazard. It's also worth noting that running any electrical equipment that drags it's own AC power cord down the copper roof after it can create a real danger for the people working on the roof if the electric cord should get sliced open and contact the very conductive copper panels. I'll have to ask them if the roof is grounded next time I'm there. Once a panel is fastened to the roof by a series of cleats and the female edge of the next panel is hooked over the male edge, a foot or so of seam must be crimped by hand to give the seamer a place to start. Once the seamer is clamped in place and turned on, it propels itself up or down the seam, creating a uniform, finished standing seam. |
| So hopefully the installed roof won't set any hang gliders or buzzards on fire, it certainly seems bright enough. The roof should turn brown in a year or so, and then slowly turn green. Since this roof is all metal, the green may end up uniform, unlike the streaky green you often see when copper is used to replace the final four feet or so of a slate roof, or even an asphalt root. When there is a different type of roofing installed higher up, you never know what kind of materials and chemicals are leaching out of that material or the fasteners and reacting with the copper when it rains. Hopefully, we'll soon have a site up that illustrates the whole standing seam roofing process step-by-step, with a lot of details on doing dormers and valleys, which are the hard part. Plenty of soldering and non-reactive nails to come, but the basic standing seam copper roof is beautiful not only for its appearance but for the simplicity of the interlocking panels that provide a weather proof seal over ridiculously long spans of roof. |

|